Every Day Tourist

Blog Post Checklist

Great job! You’ve added your blog content. Here’s a checklist of things to help you format and set up your blog post for consistency. It’s also good to reference a sample blog post so you can follow the design style. Open this blog post and use it as a reference point.

  1. Resize Photos for Web

  2. Format Images

  3. Add Last Word

  4. Add Thumbnail Image

  5. Add page title and meta description

  6. Link to ADDITIONAL blog posts

  7. See How to Get a Blog URL

  8. Update Feature section (if applicable)

Resize Photos for Web

Resizing photos for web is an important step when you’re adding blog posts because it minimizes the file size of each photo and the length of time it takes to load the page. Large photo sizes will slow down your site and affect your SEO rankings.

Screen Shot 2020-06-29 at 7.44.39 PM.png

Go to https://bulkresizephotos.com/

Upload your photos. Pro Tip: You can upload more than one at once.

Screen Shot 2020-06-29 at 7.41.28 PM.png

Select File Size from the left sidebar

Ensure the maximum file size is set to 50.00kB. This is the smallest file size that will still achieve decent image resolution so your photos don’t look blurry when you add them to your blog post.

If you’re resizing full-width banner images, adjust the size to 150kB.

Screen Shot 2020-06-29 at 7.41.28 PM copy 2.png

Click Start Resizing

Your files will download automatically. Now you’ll have web-ready photos for your blog post that won’t slow the website down!

Format Images

When adding images to your blog posts, follow these formats for consistency. It will create an easy-to-read grid look for your photos that are easy to scan and scroll through. You can combine multiple rows of 1, 2, 3 and 4 photos for more visual appeal.

1. One Image

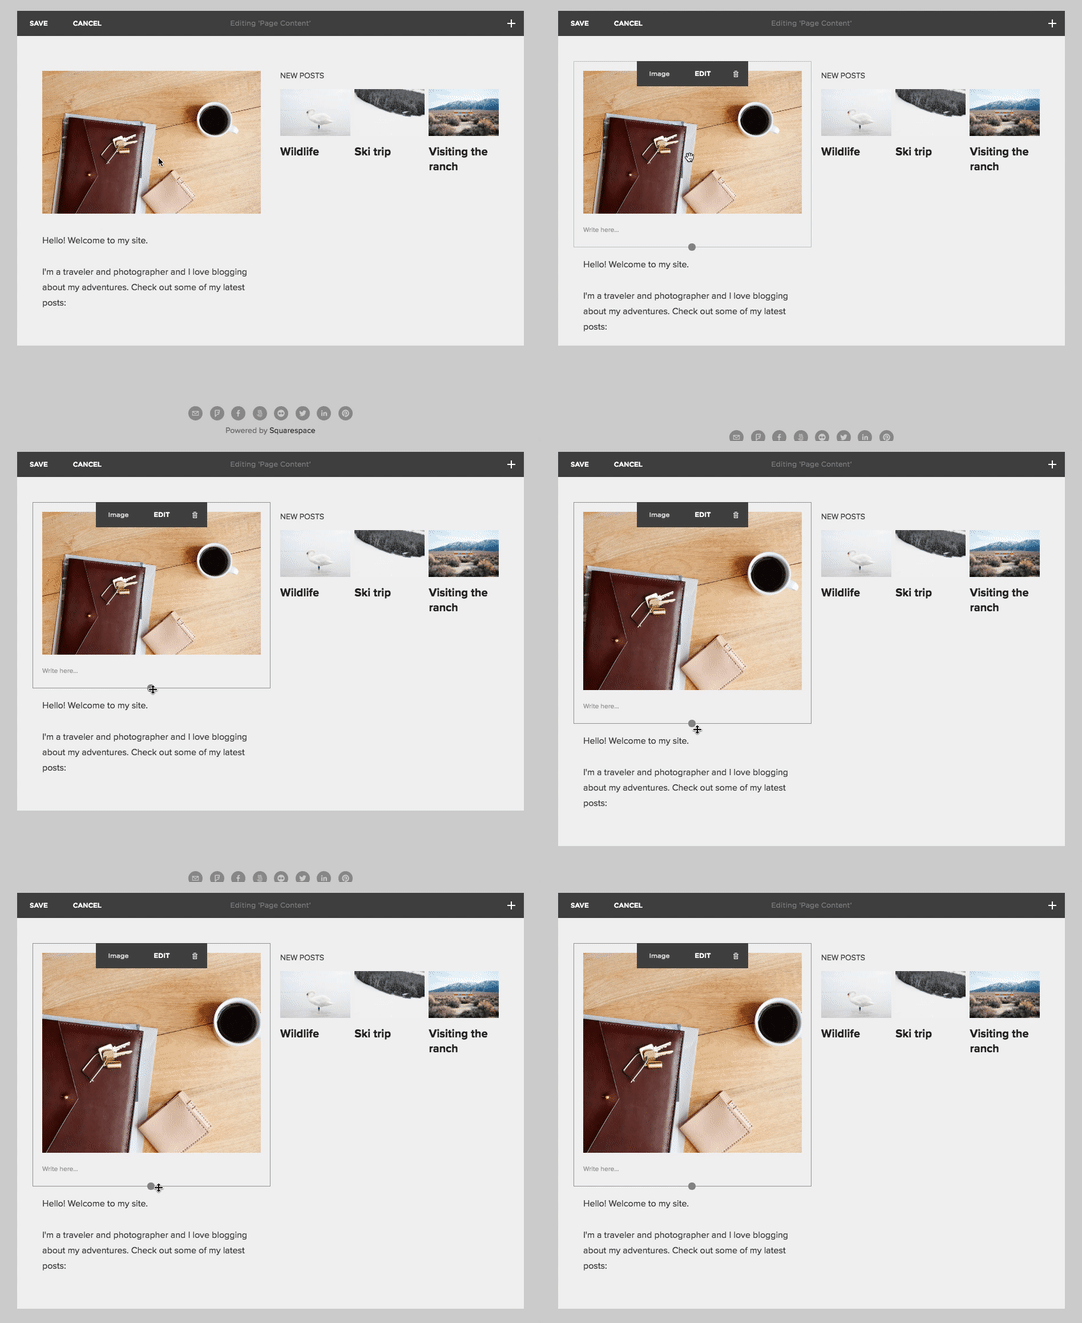
When you only have one image to display, add an Image Block and let the image span the full width.

little free library 5.jpg
cropping handle.gif

Pro Tip: You can trim an image block’s height with a cropping handle so the content can resize without distortion. Click the block, then click and drag the circle that appears at the bottom of the block. This will shorten the image height.

2. Two Images

When you have two images, drag the image block side by side.

little free library 2.jpg

3. Three Images

When you have three images, drag the image blocks side by side.

little free library 8.jpg
little free library 4.jpg
little free library 6.jpg

4. Four Images

When you have three images, drag the image blocks side by side. They should all be the same height, so you may need to use the cropping handle to adjust one of the images. The third and fourth photo in the row below are not the same height as the first two and should be adjusted.

little free library 9.jpeg
little free library 10.jpg
little free library 11.jpg
little free library 12.jpg

Add Last Word

Screen Shot 2020-06-30 at 7.27.37 AM.png

Last Word is the section at the bottom of your blog post that summarizes what the post was about.

1. Add an Image Block

bg-dark-green.jpg

2. Right click and Save this background image.

Upload it to the Image Block.

Screen Shot 2020-06-30 at 7.29.43 AM.png

3. Format the Image Block.

Click the Design tab at the of the Image Block editor. Select Poster. Click Apply.

4. Add Text

Add Thumbnail Image

Don’t forget to add a thumbnail to your blog post! This is the image that shows up when someone clicks on a blog page.

Screen Shot 2020-06-29 at 8.17.50 PM.png

Blog posts displayed on Calgary Off the Beaten Path page that have a thumbnail image.

Screen Shot 2020-06-29 at 8.18.01 PM.png

Blog posts displayed on Calgary Off the Beaten Path page that don’t have a thumbnail image. You can see how there’s a lot more visual appeal when blog posts have a thumbnail image.

Check out this Squarespace tutorial to learn how to add thumbnail images to your blog posts.

Pro Tip: Use https://bulkresizephotos.com/ to resize your thumbnail image.

Page Titles and Meta Descriptions

Use this spreadsheet to help calculate the length of page titles and meta descriptions.

Page Titles 

Page Titles should follow this format

Primary Keyword - Secondary Keyword | Brand Name

  • Should be more than 50 characters

  • Should be less than 60 characters

Check out this article for good advice on writing page titles.

Meta Descriptions

  • Should be more than 140 characters

  • Should be less than 160 characters

Check out this article for additional advice on writing meta descriptions.

How to get a Blog URL

When you move a blog post from one blog page to another (i.e. Wandering Canada to Street Views) you need to redirect the URL to point to the new blog page. This way, if someone has an old link, they’ll be redirected to the newly moved blog post. You’ll also need a blog URL if you’re linking to a specific blog post (i.e. in the Feature section on the home page).

Screen Shot 2020-03-22 at 11.02.01 AM.png

1. In the Blog Page panel, hover over the post and click Edit.

Screen Shot 2020-03-22 at 11.02.23 AM.png

2. Click Options at the top

3. Copy the URL and paste it into the Word Doc provided.

4. Click Cancel to exit the blog post without saving any changes

A couple things to note: 

I only need the URL for blog posts that don't have a thumbnail image. On the Street Views Blog page, you'll be able to see which posts don't have a thumbnail image because they will only have a text title. If they have a thumbnail image, I've already redirected the URL.

Using the short keys on your Mac to copy and paste will make things faster. Command + C = Copy and Command + V = Paste

Update Feature Section

Screen Shot 2020-03-26 at 8.03.37 AM.png
Replace the blog photo

Replace the blog photo

Update the Clickthrough URL of the photo so the image redirects users to the blog post. Click the Gear icon.

Update the Clickthrough URL of the photo so the image redirects users to the blog post. Click the Gear icon.

Toggle Open in New Window on

Toggle Open in New Window on

1. Add a new image

The ideal image size is 400px x 400px. The image should be less than 100 kb.

Make sure to add a link to the image, so when clicked it will redirect users to the blog post. Click the Gear icon beside the URL and ensure the link Opens in New Window.

2. Update the title

The blog title should be in H3 text. It should also link to the blog post. Click the Gear icon beside the URL and ensure the link Opens in New Window.

You’ll need the blog post URL handy (see instructions for “How to get a blog URL” above). Remember to add the blog page that the post belongs to. Make sure to include / in front of the blog page and to separate the blog post so it reads like this: /blog page/blog post →/calgary-visitor-information/cooleset-neighbourhoods-beltline

/calgary-visitor-information

/city-planning-101

/wandering-canada

/globe-trekking-international-travel

/street-views

3. Update the “Read more” link

Add the blog post URL. Click the Gear icon beside the URL and ensure the link Opens in New Window.